Pages

Thursday, March 29, 2012

Good Deed and Time Out Chart


We have tried many discipline techniques with our girls but Time Outs seem to work best.  This chart is great for two reasons: (1) Ava actively seeks out things that she can do to earn a Good Deed smiley face, and (2) It helps keep things in perspective.  When Ava is having a bad, misbehaving day, I can tend to focus on the negative.  This chart helps remind me of the good things she's done and I try to focus on that.

To make this:

1.  I bought a large, square piece of card stock and wrote out the details with a Sharpie.  I laminated the sign so that it would last longer.

2.  I made the smiley faces using my circle cutter with card stock.  I had them laminated too.

3.  I wrote the days of the week on card stock, cut them out and laminated them.

4.  Then I bought circle-shaped sticky Velcro for the smiley faces and the days of the week to stick to.  I put the soft side of the Velcro on the green card stock and the rough side on the backs of the smiley faces and days of the week.


5.  The back of the sign holds the extra pieces.  I just cut strips of sticky Velcro and spaced them across the back of the sign.

6.  Then I hole punched it and added a piece of ribbon and hung it up in the kitchen.

I know all kids are different and this won't work for all kids but it's certainly helped us.  When Tim gets home from work, he always asks Ava how her day was.  They look at the chart and talk about when went well and what didn't.  It helps Ava take responsibility for her good deeds and time outs!

Pin It

Tuesday, March 27, 2012

Stuffed Portobello Mushrooms


This is my FAVORITE dish right now and it's super healthy!  We stumbled this recipe by accident.  My mom bought Portobello mushrooms and didn't know what to do with them so she gave them to Tim to figure something out.  Tim found this recipe here.  It's meant to be a side dish but it's so filling that it could be a main course.  Thanks Mom!


Ingredients:
2 Portobello mushrooms
1-2 teaspoons olive oil
1-2 teaspoons balsamic vinegar
Salt and black pepper
3 cloves garlic, finely chopped
2 cups spinach leaves (at least, sometimes I use 4 cups because they cook down so much)
½ cup canned cannellini or white kidney beans, drained and rinsed
2 tablespoons grated Parmesan cheese

Instructions:
Preheat the oven to 450°F. 
Set the mushrooms gill side up on a rimmed baking sheet covered in foil. 

Combine the oil and vinegar in a small bowl.

Brush the oil and vinegar on the mushrooms.  You don't want the mushrooms to be soggy so don't go overboard.  Season with salt and pepper and bake for 15 minutes. 

Meanwhile, coat a large nonstick skillet with olive oil or cooking spray.  Place over medium-low heat and saute the garlic until it starts to brown.

Add the spinach a handful at a time, stirring constantly, until it cooks down.  Then, stir in the beans and salt and pepper to taste; cook for 1 minute to combine the flavors. 

Fill the mushroom cavities with the spinach mixture.  Sprinkle with cheese and bake for 10 minutes until the mushrooms are warmed through and the cheese is melted.  Yum!


Pin It

Monday, March 26, 2012

Easter Garland


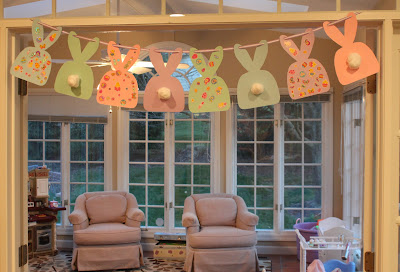
I don't have a whole lot of decorations for Easter so I thought I'd make some this year.  I found a similar idea on Pinterest and it looked like a fun project I could do with the girls.


First, we went to Joann's and picked out some paper.  We decided on pastel gingham prints and matching solid card stock (except for yellow, I thought I had it at home but I was wrong):


Then I made a bunny template out of white card stock.  I folded the card stock in half to draw half of the bunny so that both sides with be symmetrical.  I also drew the ears separate from the body and taped them together:


Then, I traced the bunny on our paper and cut them out:


I decorated all of the gingham bunnies with cotton balls for tails (I used double stick tape - Elmer's glue warped the paper), then I hole-punched each ear and strung ribbon through the ears to hang them on our fireplace:


The girls decorated half of the solid pastel bunnies with Easter stickers:


Then Ava stuck the cotton balls on the other half of the solid pastel bunnies, hole-punched the ears and helped string the ribbon through the ears.  We hung the girls' garland over the entrance to the sun room/play room so they can look at it every day!  


It's starting to feel like Easter finally!


Pin It

Friday, March 23, 2012

Training Wheels or Balance Bike?

Ava's 4th birthday is coming up and we're getting her a new bike.  Currently, she gets around by scooter.  I can't decide whether to get her a bike with training wheels or a balance bike.  Here's what I am considering:


Anyone have any suggestions?  Pros / Cons to training wheels vs balance bikes?  Any other bikes you think I should consider?  Also, where do people buy helmets?  I've tried to fit some helmets from Walmart on Ava's head and nothing seems to fit right.  Help!  Her birthday is in 3 weeks!

Pin It

Thursday, March 22, 2012

Chicken & Black Bean Soup


This soup has become a go-to favorite in our house.  My husband found the recipe on the wrapper of the can of black beans.  I don't even mind making it because it's so quick and easy.  You have to try it!


Ingredients:
4 cans (15 oz) Bush’s Seasoned Recipe Black Beans, undrained
2 boneless skinless chicken breast
2 can (16 oz) reduced sodium chicken broth
1 cup salsa
1 large chopped onion
2 tablespoons chili powder
Shredded Mexican cheese
Cilantro
Tortilla chips


Note:
The ingredients above will make 4 large bowls of soup.


Instructions:
Grind two cans of beans (including liquid) in a food processor.
Pour all (4) cans of beans into a large saucepan.
Add chicken broth, salsa, onion and chili powder.  The soup will thicken so don't worry.
Bring to a boil, stirring occasionally so it doesn't stick to the pot.
Add chicken breast and boil for 10 minutes, stirring occasionally.
Remove and dice chicken breast and add back to sauce pan.
Stir and boil for 2-3 more minutes.
Top with shredded cheese, cilantro and tortilla chips.  Enjoy!


Pin It

Wednesday, March 21, 2012

Chocolate Covered Marshmallow Pops


I meant to post this yesterday but the girls and I met their Grandma and Grandpa at the Botanical Gardens and when we got home I was exhausted.  It was such a beautiful day to walk around the gardens.  Here's one of my favorite photos.  I love that Sidney insists on wearing hats outside.  Not only is it super cute but it also eases my worries about her sensitive skin in the sun.


Back to the treats!  I decided to make these Chocolate Covered Marshmallow Pops rather than my usual Cupcake Bites because I was running short on time and these are significantly faster to make.  The only downside...I had to make them the day of the party because I was worried that the marshmallows may not keep well over night.  They are entirely sealed in chocolate but just to be safe, I made them the day of the party.  It probably took me just under an hour to make 28 of them.  I found the idea on The Slow Roasted Italian blog.


Ingredients:
1 bag of Marshmallows
1/2 bag of Wilton Candy Melts
1/4 brick of Chocolate Almond Bark
Lollipop Sticks (6" in length)
Decorations (M&M's, sprinkles, melted colored chocolate for drizzling, etc.)


Instructions:
Line a cookie sheet with parchment paper and line up your marshmallows on the paper.
In a microwave safe bowl, melt your chocolate or candy melts in 30 second intervals.  Be sure to stir after each 30 second interval.


 Dip about 1/2" of the tip of your lollipop stick in the melted chocolate.


Push the chocolate dipped end of the lollipop stick through the marshmallow and repeat for all the marshmallows on the tray.


Dip the marshmallows in the chocolate until they are entirely covered.  I used a spoon to get the top of the marshmallow covered.


Tap the lollipop stick on the bowl to remove the excess chocolate.  Be sure to tap the lollipop stick closest to the marshmallow; otherwise the marshmallow could come off.


Decorate the marshmallow and place it back on the parchment paper to dry.  Allow the marshmallows to sit and dry for an hour or two.


Arrange on serving trays and enjoy!  In keeping with our Elmo party theme, I also added some Oreos topped with Elmo sugars that I found at the Party Store.  I used frosting to attach the Elmo sugars to the Oreos.


Pin It

Monday, March 19, 2012

Sidney's Elmo Birthday Party

Sidney...
... 2 years oldnot so little anymore
... the HAPPIEST person i know
... her happiness is contagious
... loves to snuggle
... chatterbox
... carries her "blankie" everywhere she goes
... loves her big sister
... jumps off most of our furniture
... a danger to herself; will for sure have stitches and/or broken bones in her future
... loves her swing set and can climb the rock wall
... does not mind that she still has to ride backwards in her car seat (still under 20 lbs)
... counts to 13 in english (and counts backwards from 10 and ends with "BLAST OFF!")
... counts to 10 in spanish (i swear, she did it one time and will never do it again!)
... loves her grandparents
... enjoys coloring and painting at her art table
... remembers to pray before mealtime
... loves to sing and knows lots of songs
... most commonly used phrase, "What dat?"
... so very loved


She also really loves Elmo so that seemed like an obvious theme for her party.  I included pictures of our party decorations - maybe you'll be inspired to have an Elmo party too!


I printed the invitations on a color printer, cut it out and taped it on to red card stock.  I found the Elmo stickers at our grocery store.  Also, the invitation says the party was on March 4th, but the girls and I were all sick that day so we had to postpone the party two weeks.  I'm so glad that we were all healthy the second time around!


PS - I still don't know how to blur out the address/phone number/email in pictures.  Can anyone explain how???  Is there a way to do it without PhotoShop?  Maybe in Paint?  I just put paper over the info in the picture above. 

I made the thank you cards by cutting this heavy red with white polka dot paper to fit my envelopes (I bought the envelopes at Hobby Lobby).  Then I found this Elmo scrapbooking paper and cut out a bunch of little Elmo's, taped them on white card stock circles and taped it to the card.


To make the wreath, I cut a number 2 out of poster board.  I should have used a thicker foam board because once I glued the pom pom balls on the number 2 it was really flimsy.  I taped a bunch of popsicle sticks to the back of the number 2 so it was more sturdy.  I made the "Sidney Street" sign using card stock and sticker letters/numbers.  I used fabric tape to hold it to the ribbon.  Then I secured a red ribbon to the back of the number 2 to hang it up.


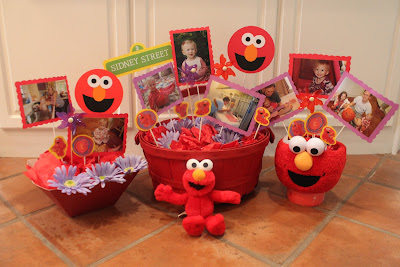
I used these baskets as table centerpieces.  First, I wrapped green Desert Foam in white tissue paper and placed it at the bottom of each basket.  I had to use several pieces for the biggest basket.  Then I filled the baskets with (1) photos of Sidney taped to colored printer paper that I cut with scalloped scissors, (2) Elmo heads made from card stock, (3) a "Sidney Street" sign, (4) pinwheels from the dollar store, (5) Elmo's cut out of scrapbook paper and taped to card stock and (5) purple flowers.  I attached everything to sticks that I painted white and stuck it into the Desert Foam at the bottom of each basket.  Lastly, I filled in the gaps with crumbled up red tissue paper and flowers.


To make Sidney's party hat, I bought a red hat and taped Elmo's face cut out of card stock paper to the hat.  Then I glued red pom pom balls to the top and bottom of the hat.  So quick and easy and cute!


I printed a bunch of my favorite photos of Sidney over the past year and taped them to our pantry door in the shape of the number 2.  Such fun memories!


I made a bunch of Elmo faces and taped them to sticks that I painted white to line the walkway to our front door.


I hung red, white and purple balloons from streamers in the door ways.


And finally...the DESSERT table (aka: my desk)!!  I bought the cake at Walmart!  This was my first Walmart cake and I have to say, I was pleasantly surprised!  Not only did it taste great, but it cost under $15!  I know I could have made it for much cheaper, but I haven't yet reached that level of talent.  Instead I made the chocolate covered marshmallows!  Stay tuned tomorrow for that recipe!  We also served Oreos - a Sidney favorite (and the only dairy and egg-free dessert she could eat!).  I used frosting to stick the Elmo sugars to the Oreos.  And Valentine-colored M&M's.  And a fish bowl filled with Goldfish crackers to honor Elmo's BFF, Dorothy.


Tim and I were exhausted by the end of the night but it was so worth it!  Sidney had such a great night!


My girls!  One party down, one to go.  Ava turns 4 in April and wants a Dora the Explorer birthday party.  Here we go again!

Pin It

Friday, March 16, 2012

Lemon Garlic Pasta


I love pasta!  Always have.  It must have been my Grandma's authentic Italian cooking that instilled my love of pasta.   When I saw this recipe on Pinterest, I knew I had to try it.  Not only does it look delicious (and tastes great too!), but it's so quick and easy to make!


Ingredients:

  • 12-14 oz. package of pasta (I used penne noodles but you can use whatever you prefer)
  • 1/2 cup grated Parmesan
  • 5 Tbsp olive oil
  • 3-4 clove garlic, minced
  • Juice of 1 lemon
  • Basil (fresh would be better, but I didn't have any so I used dry basil flakes)
  • Ground pepper, to taste

Note:
These ingredients will make 4 servings.


Instructions:


  1. Sauté the garlic over low heat in 1 Tbsp olive oil until the garlic starts to brown on edges. Immediately remove from heat and reserve.
  2. Meanwhile, boil your pasta and chiffonade some basil leaves if you're using fresh basil.
  3. Once the pasta is ready, drain and place in a bowl.
  4. Add the garlic, basil, cheese, lemon juice and 4 Tbsp olive oil and mix well.
  5. Place it on a plate and crack some pepper over it.

I added asparagus to our meal.  If you want to see the instructions for the asparagus, click here.


Pin It

Wednesday, March 14, 2012

Chore Charts

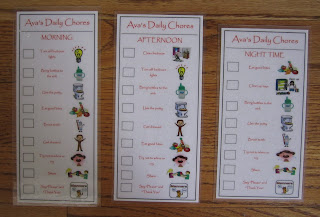
I hate it when I feel like the mom who's always nagging at my kids to do things they don't want to do.  It puts everyone in a grumpy mood and sets a bad tone for the day.  Then I found this idea for homemade Chore Charts on Pinterest and decided to create my own.  Here's what I came up with:


I made these Chore Charts in Excel.  I found the images (most of them clip art) online.  And I had them laminated so that the girls could use a dry erase pen to check off the chores when completed.  We hang them on our refrigerator so that we see them all the time.


If you'd like to use my chore charts as a template to get started, click here to download my file.


Tim thought it was a bit ambitious to go from no formal chores to 3 chore charts a day.  In hindsight, he may have been right, but after a month of chore charting, I can tell that the girls are getting better every day.  Good luck!

Pin It
Related Posts Plugin for WordPress, Blogger...