Pages

Friday, August 31, 2012

Pretzel Cookies with Chocolate and Peanut Butter Chips


I am not a big candy bar person, but I have a HUGE weakness for Take 5 bars.  Have you tried one?  They are unbelievable.  They're called Take 5 bars because there are 5 ingredients: milk chocolate, peanuts, caramel, peanut butter and pretzels.  Genius.  When I found this recipe for Pretzel Cookies with Chocolate and Peanut Butter I knew I had to try it.  It's like a Take 5 cookie less the caramel.  My in-laws were coming over to celebrate my birthday so it was the perfect excuse to make cookies.  I really loved how they turned out but next time I'm going to figure out a way to add caramel.  Maybe skip the chocolate chips and add Rolos?


Ingredients:

1 1/2 cups of all purpose flour
1/2 tsp. of salt
1/4 tsp. of baking soda
1/2 cup of butter at room temperature
1/2 cup of tightly packed light brown sugar
1/3 cup of granulated sugar
1 egg (beaten)
1 tsp vanilla extract
1 cup milk chocolate chips
1/2 cup peanut butter chips
1/2 cup broken up pretzel pieces
Pretzel Salt or Sea Salt

Instructions:
1.  In a medium bowl, sift together the flour, baking soda, and salt. Set aside.
2.  In a larger bowl, beat the butter and sugars together on medium speed until light and fluffy (about 2-3 minutes). 
3.  On low speed, slowly add the beaten egg and vanilla extract. Beat to combine, scrape down the sides of the bowl.
4.  Add the flour mixture and beat just until there are no more streaks of flour. 
5.  Stir in the chocolate chips, peanut butter chips, and preztels. 
6.  Cover and refrigerate for an hour.
7.  Preheat the oven to 350F and line baking sheets with parchment paper. 
8.  Scoop out well rounded tablespoonfuls of the dough and place on the parchment paper.  Smash the balls down a bit and sprinkle with pretzel salt. Leave about 2 inches between each ball. 
9.  Bake for 10 minutes. If you prefer crispier cookies increase the baking time by 1-2 minutes. 
10.  Allow the cookies to cool on the baking sheet for a few minutes before removing.

Yield: 20 cookies

Tips:
The only changes I might make next time is to add caramel somehow and use my own cookie recipe.  This recipe was good, but if you have a favorite cookie recipe feel free to use that instead.

Pin It

Wednesday, August 29, 2012

Grandparents Day Crafts

If any of our Nana's or Papa's are reading this - please stop or your surprise will be ruined!

Tim and I lived out of town for 10 years after we graduated from college.  While it was our choice and we loved the experience, our end goal was to get ourselves back home eventually.  When Ava was two and Sidney was a newborn, that dream became a reality.  Ava and Sidney love spending time with their grandparents and cousins.  And the more people that love our kids the better!

When I told Ava that Grandparents Day was coming up (September 9th!), she immediately wanted to do an art project for a gift.  Here's what we came up with:


FRONT:
I printed the poem on regular 8.5x11 printer paper and the girls stamped their hand prints at the bottom.  I cut the paper down and used double stick tape to secure it to a piece of yellow card stock.


BACK:
I printed out a questionnaire on 8.5x11 purple printer paper and interviewed Ava.  Then I cut the paper down and double stick taped it to the back of the yellow card stock.  I took it to FedEx Kinkos to laminate it and now we have a Grandparents Day gift from the girls!

The questions I asked Ava are:

1. What is your favorite thing to do with Grandma and Grandpa?
2. If you could make any wish for Grandma and Grandpa, what would you wish for them?
3. What is Grandma really good at doing?
4. What is Grandpa really good at doing?
5. What do you think Grandma and Grandpa like to do when they were your age?
6. If you could spend a day with Grandma and Grandpa what would you want to do?
7. What do you love most about Grandma and Grandpa?


If you want any of these templates, click here to download the poem and click here to download the questionnaire.

Also, click here to see our 2013 Grandparents Day Card!

Pin It

Monday, August 27, 2012

Tracy's Healthy Bran Muffins

My sister-in-law, Tracy, made muffins for my dad for Father's Day.  He loved them so much that he asked her to show him how to make the muffins.  I witnessed this event.  It was probably the first time my dad has baked in his entire life.  It was pretty hilarious.  I'd love to see my dad try to bake these muffins again on his own.

I decided to try out the recipe myself.  I will warn you that if you're expecting a yummy, sweet bakery muffin, this is not the muffin for you.  If you want a healthy muffin that you can eat on the go and has a little bit of sweetness, you'll like this muffin.


Ingredients:
1/2 cup multi-grain flour (you can buy this in specific quantities in the bulk bin section at Whole Foods to avoid having to buy pre-packaged)
2 tsp baking soda
4 tsp baking powder
1 cup wheat germ, raw
1 cup whole ground flax seed meal
2 cups wheat bran
1 1/2 cups water
1/2 cup milk
1/2 cup raw agave nectar
1 cup unsweetened applesauce
8 egg whites
1 1/2 cups raisins (or more if desired)
1 cup chopped pecans (or more if desired)

Yield: 26 muffins

Instructions:
1.  Preheat the oven to 350 degrees.
2.  Spray muffin tin with non-stick baking spray or use muffin cups.
3.  Combine dry ingredients (multi-grain flour, baking soda, baking powder, wheat germ, flax seed meal and wheat bran) in a large bowl.
4.  Add water and milk and mix until combined, being careful not to over-mix.
5.  Add agave nectar and applesauce and mix - don't over-mix.
6.  Add egg white and mix.
7.  Add raisins and pecans and mix.


8.  Fill muffin tin about 3/4 full with ingredients.
9.  Bake for 25 minutes.  


10.  Allow muffins to cool after baking and store in an air tight container.  They will last for 4-5 days.  After 5 days, I peel the muffin cups off and wrap each muffin individually in foil, seal them in a freezer bag and store them in the freezer.  Just reheat them in the microwave for ~45 seconds and they're ready to eat!

I think these muffins will be the perfect, quick and easy breakfast when the new baby arrives.  I always find it so hard to feed myself healthy foods when I have a newborn.

Pin It

Thursday, August 23, 2012

Baby Prep List


I found a great blog post through Pinterest detailing all the things you should do before your newborn baby arrives.  Even though this is my third baby, I thought I'd check it out and see if there was anything I hadn't considered.  The best part of the blog post was the hundreds of comments from other moms about the things most important to them.  As I read through the comments (all 200+), I found myself copying and pasting ideas into a Word document.  Then I thought to myself, "I should share this information with other soon-to-be-moms!"  So here you go.  And if you have more helpful hints to add, please comment!


Baby Prep List


For the Hospital

  • Make a list of things to pack in your hospital bag.  Click here for a list of ideas.
  • Put together a folder with all your important information to take to the hospital.
  • Buy nice card stock.  Bring it to the hospital and ask the nurse for extra copies of the baby’s foot prints for framing in the nursery or a baby book keepsake.


For the Home

  • Bring in a cleaning service to do a good deep clean of your home.  Groupon usually has good deals.
  • Stock the freezer with meals that you can easily pop in the oven after the baby arrives.  Click here for a list of great freezer meals.
  • Buy lots of soap – hand soap, dish washer soap, laundry soap.  There’s tons of washing to do and your guests can wash their hands before holding the baby.
  • Put a waterproof crib liner under the sheets on mom’s side of the bed in case your water breaks when you’re sleeping.  Also, you can leave it there after the baby arrives in case breast milk leaks at night.
  • Make a “Please Knock” sign for the front door so visitors don’t wake the baby.
  • Sterilize bottles, pacifiers and breast pump equipment ahead of time.


For Mom’s Lady Parts

  • Load up on giant maxi pads or Depends.  Save your hubby the embarrassment of having to go out and buy them for you after the baby arrives.
  • Buy at least 6 pair of granny panties that you won’t mind tossing later. 
  • Make a few Padsicles (This was a pure genius Pinterest find)!  Pour witch hazel on some of those monster pads and pop them in the freezer. 
  • If you’re nursing or pumping, stock up on breast pads, nipple cream, a comfy nursing bra and breast milk storage bags.
  • Stool softener.  Enough said.
  • Buy Tucks witch hazel pads and Dermoplast pain relieving spray for stitches.  Sitz bath help too.
  • Buy a spouted bottle.  Fill it with 1/3 witch hazel and 2/3 warm water.  If you need stitches, it will help when you go to the bathroom.


General Items

  • Prepare a baby announcement email to all the friends and family you want to notify of baby’s arrival.
  • If this is not your first child, buy a gift from the baby to the older siblings.  Could be a book or a toy or a big brother/sister t-shirt.
  • Make a pre-baby bucket list.  And check everything off!  
  • Pay bills in advance.

Did I forget anything???


Pin It

Tuesday, August 21, 2012

34 Years Young


Today is my birthday!  Doesn't that cake look amazing!  I'm not a big cake person but I think I'd be tempted to eat a piece of that cake.  Since my birthday falls on a Tuesday this year (boo!) we celebrated over the weekend.  The weather was perfect all weekend - I felt so lucky because it has been so unbearably hot outside lately.  Here are a few highlights from the activities:

St. Louis Zoo
I took the girls to the Zoo on Friday.  We hit the usual spots - train, carousel, Penguins and Puffins, lunch and then the train again.


St. Louis Arch
Tim and I hadn't been up in the Arch for years.  So many years that we didn't remember any part of the experience!  This was the girls first time up in the Arch too.  If you go, be sure to go early in the day and reserve your tickets online ahead of time.  The security check point line can back up after 11am.  

These are the tiny window that you can look out.
 Busch Stadium, or as the girls call it, Cardinal Baseball.
Taking a rest in the park outside the Arch with some juice.

Soulard Farmers Market
I wish this farmers market was closer to our home.  It has everything and the prices are great.


We bought the ingredients for Gazpacho Soup (my favorite) at the Farmers Market.  Sidney helped Tim make the soup (see it on the counter in the giant tupperware container - it will last me all week!).

Katie's 4th Birthday Party
Ava's friend, Katie, celebrated her 4th birthday on Sunday.  It was a fairy princess party - so cute!


I couldn't have asked for a better birthday weekend!

Pin It

Monday, August 20, 2012

No-Bake Chocolate Chip Granola Bars

Ava and I love Fiber One Chocolate Chip granola bars.  I wish Sidney could eat them but they contain dairy and nuts so they're off limits for her.  When I found this recipe for chocolate chip granola bars on Pinterest I was super excited because I could make them with Sidney-friendly ingredients!


This was my first time making the granola bars and they didn't turn out nearly as pretty as Lauren's in the picture above, but I learned a couple lessons.  First, the recipe calls for a 12x8x1 jelly roll pan.  I didn't have one so I used an 8x8 baking pan.  Even with the smaller pan, my granola bars were still on the slim side.  I wish I had doubled the recipe and still used the 8x8 pan so the bars were chunkier.  Second, a few of my granola bars broke apart when I was cutting them. This could be because they weren't thick enough, but it could also be because I didn't pack them in tight enough.  Or I may try reducing the butter to 3 tablespoons next time.

Regardless, they were still yummy.  The granola bars that broke apart I saved and used in my yogurt - yum!


Ingredients:
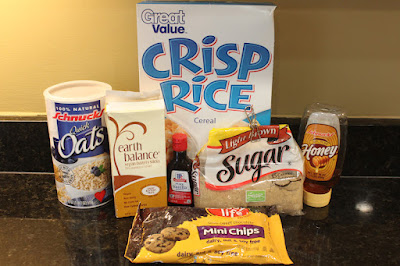
2 cups quick cooking oats {not rolled oats!}
1 cup crispy rice cereal
2 Tbsp Whole Ground Flaxseed Meal (I decided to add this at the last minute so it's not in the picture above.  You can't taste it so it's a good way to sneak in some fiber and Omega 3s.)
1/4 cup butter
1/4 cup honey
1/3 cup packed brown sugar
1/2 teaspoon vanilla
2 tablespoons mini chocolate chips

NOTE: You may want to double the ingredients!

Instructions:

1.  In a large bowl, stir oats and rice cereal together. Set aside. 
2.  In a small pot, melt butter, honey and brown sugar together over medium high heat until it comes to a bubble. Reduce the heat and cook 2 minutes. Pour in vanilla and stir. 


3.  Pour over dry ingredients and mix well to moisten all ingredients. 

4.  Pour into lightly greased small jelly roll pan (I used an 8x8 baking pan) and press out to be about 3/4 inch in thickness.  If your pan isn’t small enough, pack the mixture into one side. You really want to press them down so they stick together.


5.  Sprinkle with mini chocolate chips and press down lightly. 


6.  Cool to room temperature for two hours or until the chocolate chips are set before cutting into bars. 


7.  Wrap in parchment or plastic wrap and store at room temperature.


Pin It

Thursday, August 16, 2012

Kiwi Crate

If you saw my post about Kid Craft Box Subscriptions, you probably know about Kiwi Crate.  Right now, Kiwi Crate is offering $20 off a new annual subscription, but the offer ends TODAY.  The total cost is $200, including shipping!  I decided to give Kiwi Crate a try.

If you're interested in trying out Kiwi Crate, email me at cathyireeves@gmail.com and I'll send you a Refer a Friend link for $10 off your order too!  I'm not sure if the $20 off promotion and the $10 Refer a Friend can be used together but it's worth a try.

I can't wait for our first crate to arrive - check back for our Kiwi Craft box post!

Pin It

Wednesday, August 15, 2012

Pre-K Addition and Subtraction Games

I have been trying to come up with fun ways to introduce addition and subtraction to my 4 year old, Ava.  After scouring Pinterest, here's my top 3 favorites:

DOMINO MATH
I added an addition and subtraction page to the back of Ava's Pre-K Workbook in sheet protectors.

I thought Domino addition was a good exercise to start with because Ava is able to count up the dots to see how the numbers add up.  This exercise is also helping her learn to write her numbers.  You can print free Number Handwriting Worksheets from the First-School website for more help.

Subtraction is a harder concept to grasp so we haven't tried this one yet.  I think when she gets the hang of addition we will move on to subtraction.

FLASHCARDS
Using a Dollar Tree photo album, I made an Addition and Subtraction work book for Ava.
 Front cover
Back cover

Then I bought a pack of addition and subtraction flash cards from Dollar Tree and slipped them into the photo sleeves.


Now Ava can use her dry erase pen to work the equations and practice writing her numbers over and over again!  It's also a great activity to pack for travel.

MAGNET NUMBER FISHING
I found these magnetic numbers at Walmart for $1.25.  I tied a string onto the end of our wooden spatula and attached a paperclip to the end of the string.  Ava fished out two numbers and tried to add them together.

I've found that incorporating a fun activity into learning math has made Ava much more interested.  And it helps make it more fun for me too!

Pin It

Monday, August 13, 2012

Pumpkin Pancakes

We're back!  We took a little vacation last week with my parents and brothers and our families to the Lake of the Ozarks.  This is the seventh year that we've managed to take a family trip, and our third time to the Ozarks.  When I was a kid we went to the Ozarks with my dad's side of the family every summer.  It's amazing to me how much work goes into these family trips and as a kid you are oblivious to it all.  Last night was our first night back at home and the girls slept for 12 hours!  That's when you know the trip was a success.

One of the best parts of the vacation was the morning.  Tim got the girls started on breakfast on our porch while I ran to Starbuck's to get coffee (don't judge, it's allowed during pregnancy now).  The view was beautiful, the weather was perfect and the girls were sweet as can be.  We were in no hurry - just able to relax.  Just what we needed.

 Our view of the lake - so peaceful in the morning.
 Sidney waiting patiently for her breakfast.
Ava is our little squirrel.  She ate nuts and berries for breakfast every morning.  

Before we left on vacation, I was bombarded with pumpkin-y treats on Pinterest.  I am a sucker for anything with pumpkin.  It seemed a bit early to be baking with pumpkin but I just couldn't resist.  I found a highly rated recipe for pumpkin pancakes using Bisquick and they lived up to the expectations.  Hope you enjoy!

Ingredients:
2-1/3 cups Bisquick mix
1/3 cup canned pumpkin
1-1/4 cups milk
1/4 cup vegetable oil
2 tablespoons sugar
1 teaspoon pumpkin pie spice
2 eggs
Mini Chocolate Chips (optional)
Maple Syrup

Instructions:
1.  Heat griddle or skillet over medium heat or to 375°F. 
2.  Grease griddle with vegetable oil or Baking Pam.

3.  In medium bowl, stir all pancake ingredients until well blended.

4.  For each pancake, pour slightly less than 1/4 cup batter onto hot griddle.  Top with mini chocolate chips.
5.  Cook until edges are dry. Turn; cook other sides until golden brown. 
6.  Serve with hot Maple syrup.


Pin It

Friday, August 3, 2012

Flower Bows

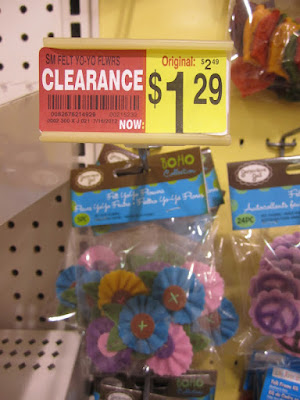
I love Michael's clearance deals.  Last week I hit the jackpot on felt flowers.  These little flowers were on clearance for $1.29 for either 5 small flowers or 4 large flowers.


The colors are super cute.  I bought two packages of the small flowers so I could make bows for Ava's "double ponies".  Here's how they turned out:
All I did was cut a circle out of felt, clipped it between the barrette and hot glued the barrette and felt to the back of the flower.  So easy!

Michael's also had a 50% off coupon available this past week.  I always print off a bunch from their website and keep them in my car in case I have the chance to run into the store and look around for a good deal.  This week I discovered Jolee's Boutique flowers.  
They are so beautiful and work great for hair bows.  Here's what I bought with my 50% off coupons:
The pink and purple flowers were easy to convert to bows because they had little slits in the back that the barrette slipped right into.

These flowers had circular stickers on the backs.
I removed the "sticker cover" (I have no idea what that is actually called) and hot glued the felt and barrette over it.

It feels like we have a huge new bow collection now!  And it was so inexpensive!

Pin It
Related Posts Plugin for WordPress, Blogger...