Pages

Monday, October 28, 2013

Dollar Crafts: Kid Halloween Decorations

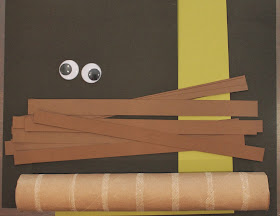
Sidney can hardly wait for Halloween to get here.  Everyday she asks to do a Halloween art project.  I've been so consumed with planning Ava's Kindergarten Halloween party that I didn't have anything planned.  Sidney really wanted to make a ghost and a witch.  Here's what we came up with using supplies found around the house:


To make the ghost, we used:
- white card stock
- black card stock
- cotton balls
- black and orange ribbon (left over from the Ghost Lollipop project)
- Elmers glue

To make the witch and broom, we used:
- black card stock
- green card stock
- brown card stock
- googly eyes
- paper towel roll
- Elmers glue


Happy Halloween!

Tuesday, October 22, 2013

Ghost Lollipops


Clara's pumpkin birthday party may be over but I am not finished with the pumpkin-y crafts yet!  Ava's Kindergarten Halloween party is coming up and I am helping plan it.  

These cute little Ghost Lollipops stuffed in a pumpkin are going to be used for a game of "Pass the Pumpkin".  It's played just like "Hot Potato".  The kids sit in a circle and pass a small pumpkin while Halloween music plays.  When the music stops the person holding the pumpkin is "out".  But don't be sad...the consolation prize is a Ghost Lollipop!  The winner gets a Ghost Lollipop and gets to keep the little pumpkin.

Here's what you need to make your very own:
Foam pumpkin
Pinking shears
White cotton cloth
Orange and black ribbon
Lollipops
Masking Tape
Awl or Power Drill

Here's how I made the Lollipop Ghosts:
1.  Using pinking shears, cut the white cloth into 6.5 x 6.5 inch squares.
2.  Cut the orange and black ribbon into 14 inch strips.
3.  Cover the lollipops in the white cloth and tie a bow using the orange and black ribbon.
4.  Use a black marker or Sharpie to make ghost eyes.

Here's how I made the pumpkin:
1.  Place strips of masking tape equidistant from each other from top to bottom around the pumpkin.
2.  Use a flexible tape measure and a pencil to make dots on the masking tape.
3.  Use an awl or a power drill to punch holes in the pumpkin.  Be sure to punch holes at a downward angle.
4.  Remove masking tape and insert lollipop sticks.

Thursday, October 17, 2013

1st Birthday Pumpkin Party

My baby turned ONE!  

This picture pretty much sums up how Clara felt about turning one.  The youngest of three girls, all she wanted for her birthday was to be a big girl.  {I assume that's all she wanted because we didn't really get her any gifts...}

But I did throw her a fabulous Pumpkin Party!  Here are some of the pictures from her big day.

Invitation
I made the invitation myself!  It's not professional quality but for my first attempt it was not bad.  I used PicMonkey and .jpeg images that I found online to create the invitation.  I had it printed at FedEx Office.  Check back to see my PicMonkey tutorial!

Outfit
This sweet little number came from Xannazoo on Etsy.  I love to shop on Etsy for special occasion outfits and gifts.

Decorations
I decorated the tables with Lollipop Pumpkins and gourds.  Click here to see how I made the Lollipop Pumpkins.  I also used Deco Mesh Ribbon and burlap for a table runner.  You can buy Deco Mesh ribbon at Hobby Lobby or Michaels and I've even seen it at Walmart.
I filled the little orange and white striped cups with Brach's Autumn Mix Candy Corn. 
The Farmers Market crate came from Walmart!  Seriously, Walmart has stepped up their game in the Arts and Crafts department.  I filled it with gourds that the girls brought home from Rombach's pumpkin patch.
 I put my Fall Mason Jars on the Dessert Table.
This is the tutu that I made for Clara before she was born.  We used it for her newborn photos.
I decorated the house with photos of Clara well before her party.  I tend to leave them up for a while after too.  We all love looking at the photos and reminiscing about the past year. Clara's Number 1 captures photos of Clara with her sisters, parents, grandparents, great grandma and Godparents.
I was amazed at the number of photos that I had of Clara.  I had to edit it down to under 100!  I try to find pictures of Clara with the family members that will be at her party.
Clara woke up from her nap to find the house had been transformed for her pumpkin party. Tim hoisted Clara up on his shoulders so she could get a better look at things.  Did you notice the picture on the cabinet in the background?  I can't believe how much she's grown!

Birthday Cake(s)
I leave the real birthday cake to the professionals to create.  They did a great job and it was delicious!  I highly recommend chocolate mousse filling!
I attempted to make a pumpkin smash cake for Clara.  I have a bad feeling that Clara may be allergic to eggs (bad bagel experience) so I made an egg-free smash cake for her.  I also made it dairy and nut free so that Sidney could have a bite.  Click here for the recipe.
I'm glad I didn't spend a lot of time on the smash cake.  The appearance and taste did not matter at all to Clara.  All she cared about was squishing it between her fingers.  In hindsight, I wish I had spread out a plastic table cloth on the floor (in addition to the seat of her high chair). Clara threw a good amount of the cake on the floor. 

Activities
The girls worked on Thankful Pumpkins with their cousins.  Sidney was thankful for "twirly dresses"!!
The kids also decorated pumpkins.  If you need to buy a bunch of pumpkins, ALDI is the place to go.  They sell huge pumpkins for $2.39!!  I bought eight of them for the kids to decorate.  I bought the face stickers online at Oriental Trading Company.


If you're planning a pumpkin party, you're in luck because there are so many great, inexpensive decorations to choose from.  Dollar Tree has a lot of great decorations.  


Happy Halloween!

Tuesday, October 8, 2013

Lollipop Pumpkins


The preparations for Clara's pumpkin party are well underway.  Thank goodness I started planning a month ago because I've been a bit in over my head with the girls' school stuff.

Planning a pumpkin-themed birthday party near Halloween is the best - there are a million fun ideas everywhere you look!  I found these Lollipop Pumpkins through Pinterest and made them for table decorations.  Here's how I made them:

What You Need:
- Orange poster board
- Pumpkin cut outs
- Lollipops
- Green pipe cleaners
- Green paper (for the leaves)
- Hay (optional)

What You Do:
1.  Cut out long strips from the orange poster board.  Remember that it needs to be wide enough to cover your pumpkin and lollipop.
2.  Fold the orange strips into a triangle shape.  I cut out a slit at the top of the triangle for the paper to fold over the lollipop stick.
3.  Before taping the pumpkin to the front of the triangle, I taped a piece of black paper to the back of the pumpkin.
4.  Cut out a leaf shape from your green paper, poke the pipe cleaner through the end and secure it around the stem of the pumpkin and the lollipop stick.
5.  Lastly, I used double stick tape to adhere the hay below the pumpkin.

Having to stare at all these cute pumpkins is pure torture for my kids!  They can't wait to tear into those lollipops!

Clara's birthday party is this weekend!  Check back to see all the pumpkin decorations.

Wednesday, October 2, 2013

Fall Mason Jars

I've been pulling together some fall decorations for Clara's pumpkin-themed 1st birthday party.  These Fall Mason Jars were really easy to make.  I bought everything (mason jars, fall fillers and fall flower stems) at Hobby Lobby.


I'm planning on using these to decorate the dessert table.  They would also work well on counter tops or table centerpieces.  Happy Fall!