Pages

Wednesday, February 29, 2012

20 Read Across America Day Ideas


On March 2nd we celebrate Read Across America Day and the birthday of Dr. Seuss!  Here are 20 fun activities that you can do with your kids to celebrate and encourage reading:

  1. Visit your local library, check out some Dr. Seuss books and have a Dr. Seuss reading marathon.  Click here is a list of all the books Dr. Seuss has written.  If you live in St. Louis, the St. Louis County Library Headquarters is hosting a Lorax Party from 2-3:30pm.  Click here for more details.
  2. Click here for a list of 75 books that build character.  Check out your favorites at the library. 
  3. Attend story time at your local bookstore.  Click here to find your local Barnes & Noble.  The B&N in Ladue will be reading The Cat in the Hat at 10am.
  4. If you can't make it to the bookstore, Barnes & Noble has a free online story time with lots of fun books to choose from.
  5. Take the Family Reading Challenge.  Turn off your TV, cell phone, iPad, iPod and video games for 20-30 minutes each day and read together as a family.
  6. Donate a book to a local school in need.  Also, there are schools in Joplin, Missouri that are still rebuilding after the devastating tornado that hit in May 2011.  Click here to find out how you can make a monetary donation to the schools.  Click here to find out how you can donate books.
  7. Make a book mark.
  8. Make your own hat from The Cat in the Hat.
  9. Make a goldfish from One Fish, Two Fish, Red Fish, Blue Fish.
  10. Start a book exchange with other families.
  11. Visit this awesome website - We Give Books - and read over 150 free books online.  For every book you read, We Give Books will donate a new book!
  12. Print this free door knob hangerhttp://www.seussville.com/special/doorknob.pdf for your kids to hang on their doors when they're reading.
  13. Make green eggs and ham for breakfast with this recipe.
  14. Visit the Mommy and Me Book Club blog.  A group of moms and their kids read stories, do art, play games, sing songs, and eat snacks, all based around the central theme of the Book of the Week.
  15. Print out these free Dr. Seuss coloring pages to color after you read the Dr. Seuss books.
  16. Practice reading sight words using these free printable flash cards.
  17. Check out these Tell Me A Story creative story cards.  Storytelling boosts creativity, communication skills, and literacy!
  18. Visit Seussvill.com for lots of fun Dr. Seuss games and activities.
  19. Find out 10 steps to teaching your child to read on the I Can Teach My Child website.
  20. The new Dr. Seuss movie, The Lorax, is in theaters on Friday, March 2nd. 
Happy Read Across America Day!


Monday, February 27, 2012

"Build A Town" Play Mat

Our Parents As Teachers educator came over for Sidney's 2 year evaluation and told me about all of the great developmental benefits of playing with building blocks.  (Here is a good article on building blocks if your interested.)  She recommended creating a "block station" somewhere in the house for the kids to encourage them to play with blocks.  I tried this but even I was not drawn to play with the blocks.  Then I found this great road play mat idea in my Disney Family Fun magazine.


It was very easy to make and I love that there are just roads.  It allows you to be creative and build your own town along the road.  I found some great blocks, a farm and town pieces on Amazon.  I also bought some cars and trucks from the Dollar Store and some town people and service workers on Amazon.  It turned out to be a great Christmas gift for the girls!


I keep all the pieces in a storage container so that they're not laying all over the floor.


Here's what you need to make one of your own:

  • Grass Flannel-Backed Vinyl Table Cover (I bought mine at Party City)
  • Thick black Duct tape
  • Thin yellow Duct tape
  • Scissors
Have fun building!

Friday, February 24, 2012

The Paper Gate

First of all, I have to give my mom credit for this idea.  She invented the Paper Gate and uses it at her house.  Second of all, I am not a child proofing expert.  This gate is not foolproof.  If it doesn't feel safe enough for you and your kids, you'll know better.


My little one, Sidney, is part human-part monkey.  She is nothing like Ava.  Ava is cautious and careful whereas Sidney is fearless and reckless.  She is constantly hurting herself.  So when we moved into our home, I knew we needed to close off the steps.


I wanted a gate in my front entry way that was cute and wouldn't ruin the wood on my banisters and spindles.  To make this Paper Gate, I cut out one side a large shipping box and covered it with wrapping paper.  I secured it to the spindles using sticky Velcro.  Works like a charm!

Thursday, February 23, 2012

Popsicle Memory Game

I have always loved playing games.  They were a big part of my childhood.  My dad taught me a lot of card games and "number" games.  My favorite is Rummikub.  I am not very competitive except when it comes to playing Tim in Rummikub.  We started keeping score in 2009.


As you can see, I am DOMINATING!  And since we're keeping score, the count is Cathy - 26 wins; Tim - 15 wins.  My dad must be so proud.  We haven't played since February 2011.  I think Tim is scared ;)

So now I'm trying to instill the love of games in my girls.  I think games are a great way to teach kids about following rules, fairness and good sportsmanship.  I found the idea for the Popsicle Memory Game on Pinterest.  


It's very simple to make.  You'll need Popsicle sticks, white paint, printed scrapbook paper, solid colored card stock, and regular and double stick tape.


First I painted both sides of the Popsicle sticks with white paint.


While the paint dried, I cut Popsicle shapes out of the printed scrapbook paper and white card stock using a ruler and a cup and a Popsicle template.  You don't necessarily have to use Popsicle shapes just because you're taping them to Popsicle sticks.  You could cut out butterflies or flowers or race cars or airplanes, or whatever.  My girls LOVE Popsicles so I stuck with my Popsicle template.


To make the Popsicle, I taped the Popsicle stick to the inside of the printed scrapbook paper.  Then I used double stick tape to secure the white card stock to the back of the Popsicle.


Then I found a tin box to keep our game pieces together.  I think it turned out pretty cute!


I also found a good article on skill-building board games by age on the Parents website.  Click here to check it out.  Happy gaming!

Wednesday, February 22, 2012

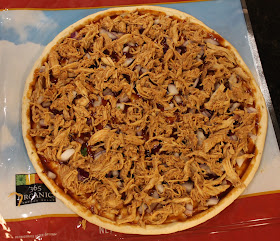
Barbecue Chicken Pizza


If you like the Barbecue Chicken Pizza from California Pizza Kitchen, you have to try this recipe. I found the recipe on The Sisters Cafe website.  They have lots of yummy recipes and I love how these 5 sisters (or I guess 4 sisters and 1 sister-in-law) came together and created such a great food blog.  They seem like a fun, tight family.


While I am primarily responsible for the cooking in our house, Tim is by far the better cook (and he enjoys it more than me too).  He is usually the one that makes this pizza, and tonight was no exception.  Thanks for a yummy dinner tonight Tim (and for letting me interrupt the pizza perfection with my photos)!


Here are the ingredients you'll need:


  • 1 pizza crust (I like to use Whole Foods 365 Organic Pizza Crust or Boboli Original pizza)
  • Just over 1/2 cup BBQ sauce, divided (I have to insist that you use Famous Daves Original BBQ sauce.  I've tried others and Dave's is simply the best.  I guess that's why he's famous.)
  • 1/4 red onion, thinly sliced or diced
  • 1 large chicken breast, boiled and shredded (see Instructions below)
  • 1 ½ cup mozzarella cheese
  • 1/8 cup fresh cilantro, chopped


And here are the instructions:

  • Preheat oven according to the instructions on your pizza crust package.


  • To boil the chicken breast, place in a pot of boiling water and let boil for ~10 minutes.
  • When it has fully cooked through, take it out of the pot and shred the chicken lengthwise using two forks.
  • Toss the shredded chicken with just over 1/4 cup barbecue sauce.  You want the chicken to be covered but not soppy (or your crust will be soggy).

  • Spread just over 1/2 cup barbecue sauce on your pizza crust.  Again, don't use too much or your crust will be soggy.


  • Spread onions over sauce.


  • Spread chicken over onions.


  • Sprinkle cilantro over the chicken.


  • Top with cheese and bake according to the instructions on your pizza crust package, or 10-12 minutes.

Tuesday, February 21, 2012

Barrette Hanger


My girls' have a ton of barrettes and they started taking over my desk drawers.  I made this barrette hanger and now my drawers stay nice and organized and so do their barrettes!  It was very simple to make.
  1. All you need is a hanger, ribbon and double stick fabric tape.  Be sure to choose a ribbon that is the correct width for your barrettes.  If you have barrettes for baby girls, you will want to use a more narrow ribbon.
  2. Cut a long piece of ribbon that will later be draped over the base of the hanger and taped together with your fabric tape.
  3. Using that ribbon, cut the remaining ribbon pieces the same length.  
  4. Drape your ribbon pieces over the base of the hanger.  Be sure to space them appropriately.
  5. Starting at the base of the hanger, begin to tape the ribbon pieces together and work your way down.
Here's what my ribbon hanger looks like without ribbons.


I used a Command hook and hung our ribbon hanger inside our pantry door (shown in the top picture).  This saves us a lot of time looking for barrettes in the morning when we're getting ready for school.

Monday, February 20, 2012

Circus Birthday Party

Sidney's 2nd birthday is coming up and I've spent the past month planning her Elmo birthday party.  I know people say that kids will never remember their birthday parties when they are this little and that's fine, but I really enjoy planning parties and making the decorations so I'm going to do it anyway.  I put a ton of work into Sidney's 1st birthday.  We had a circus theme.  I thought I'd share some of the pictures in case anyone is inspired to throw a circus party.


I ordered Sidney's birthday outfit from Stitcheroos.  Adrienne at Stitcheroos is great!  We've bought birthday outfits from her twice now.  


I ordered the invitations and thank you cards on Etsy.  I couldn't figure out how to blur out my address so I didn't post the actual invitations, but the links above will take you to the Etsy site where I bought them.  You can also find stickers and banners and other party accessories on Etsy.


I made Sidney's birthday hat by taping wrapping paper around a plain birthday hat and gluing pom pom balls on the hat.  I also cut a number "1" out of red and yellow card stock and taped it on the hat.


I made a trapeze monkey using a wrapping paper roll, wrapping paper and ribbon.  I used safety pins to secure the monkey's legs around the wrapping paper roll.  I hammered small nails through the ribbon to secure it to the door frame.


Here's the dessert table:


I bought the cake from McArthur's Bakery.  I loved how they decorated it!  I found the popcorn boxes at Hobby Lobby - they have a ton of circus party decorations.  I made the cupcake bites.  And I bought a bunch of boxes of animal crackers to set out. 


Now for the carnival games!  We cleared out our sun room and set our games up.


We had 5 different games:


Ping Pong Ball Toss: I taped Solo cups onto a thick piece of foam board.  If you got a ping pong ball in the cup, you'd get 5 tickets.


Ring Toss: I tapped wrapping paper on one liter bottles of soda.  I bought the rings at Hobby Lobby.  I'd guess you could also get them at a hardware store.  If you got a ring around a bottle, you'd get 10 tickets.


Bean Bag Toss: I cut the Bean Bag Toss mat out of poster board.  I bought the bean bags at American Carnival Mart.  Wherever your bean bag lands on the mat determines the number of tickets you get.


Duck Pond:  I had the tub already so all I needed to buy was the rubber ducks.  I wrote a number on the bottom of each duck corresponding to the number of tickets you'd get.


Pin the Nose on the Clown:  I bought the clown face and noses at American Carnival Mart.  I cut out the clown face and taped it onto a piece of decorated poster board.  If you pinned the nose on the clown, you'd get 5 tickets.


I made the signs for each game using poster board, card stock, ribbon and tulle.  I hung them from the windows using suction cup hooks.  The games were so much fun - even the adults were competitive!


We also had a prize table:


I covered old boxes with wrapping paper and labeled the boxes with the prizes ticket value.


The Photo Booth was super fun!


I bought the fabric backdrop from Jo-Ann's and I got the clown accessories from American Carnival Mart.  We took pictures of all our guests dressed up - very cute collage!


We love you Sidney!  We can't wait to celebrate birthday #2!


Friday, February 17, 2012

Shaving Cream Paint


My girls LOVE to take baths so I'm always looking for fun bath toys and activities.  I found this idea on Pinterest.  All you do is mix shaving cream with food coloring and you have bath paint!  I followed the directions on the food coloring box for coloring eggs to make the colors.  Everything turned out great except for purple - it's kind of a grayish purple.  I was a bit worried that the food coloring would stain the bath tub but it washed off very easily with no staining.  The girls had so much fun - we'll definitely do this again!


Wednesday, February 15, 2012

I love you because...


I do not enjoy buying gifts for people, particularly adults.  Finding the perfect gift stresses me out.  I know that sounds like a terrible thing to say but it's not that I don't enjoy giving gifts.  The problem is that I put pressure on myself to find a really thoughtful gift that says, "I know you so well and I found the perfect gift for you."  Some people are really good at that.  I am not that person.

Tim and I started dating when I was only 15 years old.  We have celebrated many, many birthdays, holidays, anniversaries, etc. over the years.  I find it really hard (and stressful) to come up with creative gifts over and over again.  So before any gift giving occasion, I tell Tim, "I won't get anything for you if you don't get anything for me."  That way, if I come up with something - GREAT!, and if not, Tim wasn't expecting anything anyway.

For Valentine's Day, Tim and I agreed that we wouldn't buy gifts for each other and instead we'd order take outs for dinner (which is kind of a present for me because it gets me out of cooking!).  But then I found a fun idea on Pinterest.  I actually combined this Pin and this Pin on Pinterest.  Here's what I came up with for Tim's gift.


I found the heart frame on clearance at Michael's for $10.  Then I just traced the glass from the frame on a large piece of red card stock and bought sticker letters to write out "I love you because...".  All you need is a dry erase pen to write messages!  I re-used an old ribbon so we can hang it up in the house (we're not sure where to hang it yet - I'm TERRIBLE when it comes to interior decoration decisions).  Here's the finished product:


I love you Tim!  Happy Valentine's Day!

Tuesday, February 14, 2012

Valentine's Day Cupcake Bites


Are these not the cutest treats you've ever seen?  And they are just as delicious as they are pretty.  I initially found the idea on Bakerella - she is so talented.  I never actually try to bake anything from her website because it just seems too difficult but I love to look at her creations.  Then I saw that The Pioneer Woman had made them and her step-by-step instructions and photos made it seem almost easy.  So I tried.  I have to say, my cupcake bites were a HUGE success.  My nieces and nephews are always asking me to make them.  While I will say that these are easy to make, they do require some time.  You can't just whip up a quick batch.  I now enlist the help of my husband - It's much faster and more fun when you have some help.


So let's get started:


Ingredients:


  • 1 box cake mix (I use Betty Crocker Super Moist Yellow Cake Mix)
  • Ingredients required for baking the cake
  • 16 oz. can cream cheese frosting (I use Betty Crocker Rich & Creamy Cream Cheese Frosting
  • 1 package chocolate almond bark (You can buy this at any grocery store and even Walmart)
  • Wilton colored Candy Melts (I bought mine at Michael’s) 
  • Medium Peanut Butter Cup Chocolate Candy Molds (You can buy these at craft stores like Michael’s or Joann's)
  • Sprinkles and M&M’s for decoration


Instructions:

  1. Bake the cake according to the box instructions.  After cake is cooked and cooled completely, crumble with your hands into large bowl. (The texture should be fine/fluffy)
  2. Using the back of a large spoon, mix thoroughly with 1 can cream cheese frosting. (I think it's easier to use my hands to mix together, but be warned it will get messy.)
  3. Roll mixture into quarter size balls (make sure they are smaller in diameter than that of your candy mold) and lay on parchment paper covered cookie sheet.  Your hands will get messy again.  Just wash them when they get too sticky.
  4. Chill in the freezer for a few minutes, until they are slightly firm, not frozen.
  5. Melt the chocolate bark in the microwave per directions on package.
  6. Using a spoon or squeeze bottle, fill each mold cavity about 3/4 of the way with chocolate.  Don't fill it to the top - leave room for the cake ball.  
  7. As soon as you fill the mold cavity, go ahead and place one of your rolled balls into it. Carefully push it down until the force causes the chocolate to push up and fill in around the sides of the ball.  Stop pushing once the chocolate reaches the top edge.  Don't push it down all the way, otherwise you'll have a flat cupcake instead of a rounded top.
  8. Place the mold tray filled with cupcakes in the freezer for just a few minutes to let the chocolate set. 
  9. In the meantime, melt the candy melts according to the package directions.
  10. Remove the cupcakes from the freezer and then gently pull up on the cake ball top to release from candy mold.  You can also turn it upside down and pop the cupcakes out from the bottom.
  11. Now, holding the bottom of the cupcake, dip the top in another color of melted chocolate and decorate.  The candy melt chocolate will harden quickly so decorate them before they harden.


This recipe makes about 100 cupcake bites.  They will last for up to a week (or more) if refrigerated in an airtight container.


Here are some other tips:

  • Don't let the number of steps in the instructions intimidate you.  I don't even have to look at the instructions when I make these - it's very easy once you do it from start to finish.
  • Check out The Pioneer Woman's step-by-step photos.
  • The more candy molds you have the better.  I think I have 7 or 8.  It will be faster if you have more molds.
  • Don't wash you candy mold in the dishwasher, they will melt.  Soak them in your sink with dish soap, wipe them down and let them air dry.
  • I've never eaten candy melts or used them in baking so I was a bit worried about how they would taste.  I was very happy to find that they taste great in this recipe.
  • I've tried using dark chocolate and semi-sweet chocolate for my cupcake base and nothing tastes better than chocolate almond bark.  I even surveyed others to make sure it wasn't just my taste.


Happy Valentine's Day!